
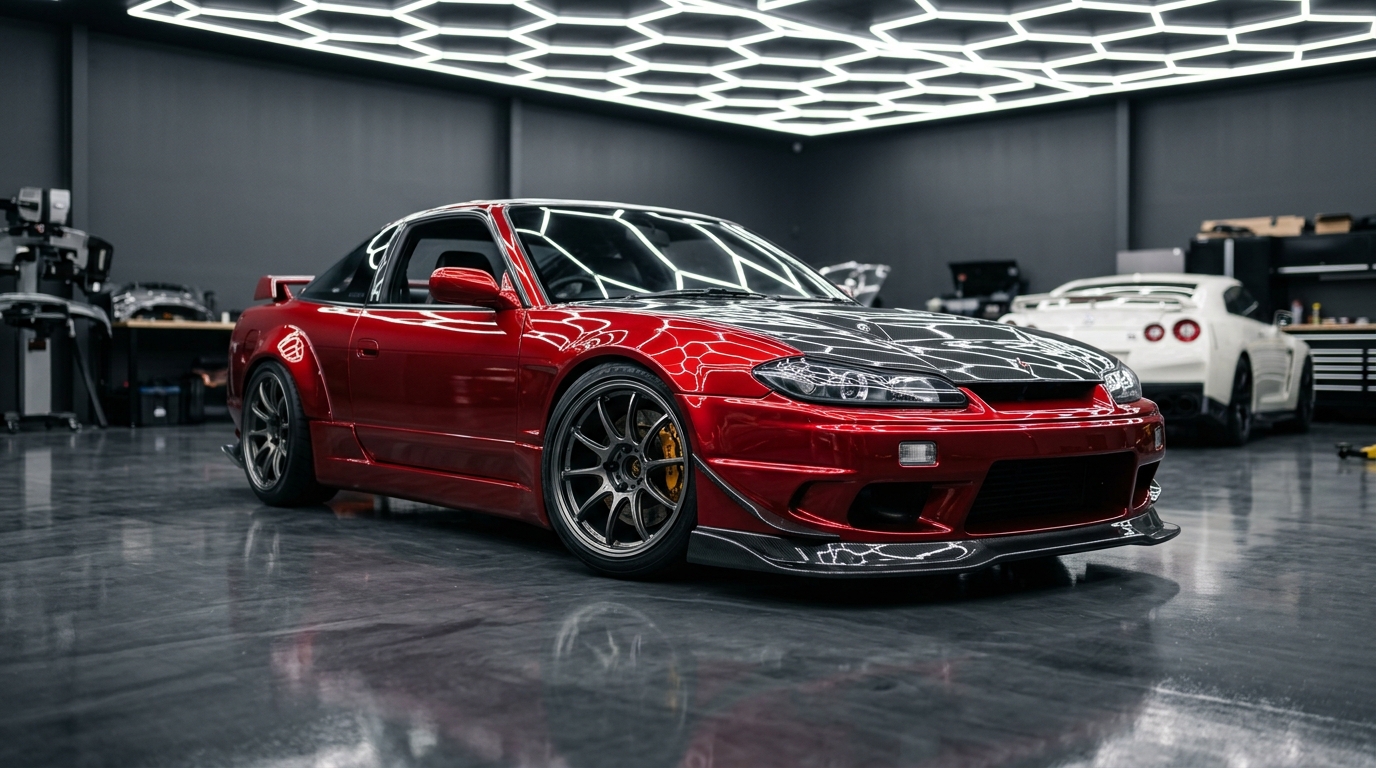
For decades, car enthusiasts have looked to the Nissan Silvia S15 as one of the most aesthetically refined and aerodynamically aggressive sports cars ever produced in Japan. Because the S15 was never officially sold in the North American market, crafting a 240sx s15 conversion—commonly celebrated as an “S13.5” or “S14.5” hybrid build—has become one of the most sought-after milestones in the automotive enthusiast community.
By marrying the accessible, rear-wheel-drive platform of the Nissan 240SX with the sharp, futuristic styling and motorsport pedigree of the Silvia S15, you get the absolute best of both worlds. In this complete guide, we break down everything you need to know about planning, parts acquisition, alignment, and execution for your 240sx s15 build.
What is a 240SX S15 Conversion?
A 240sx s15 conversion is the specialized process of modifying, retrofitting, and grafting Nissan Silvia S15 exterior body panels and mechanical hardware onto an earlier Nissan 240SX chassis (either the 1989–1994 S13 or 1995–1998 S14). The most iconic variation is the “S15 front-end conversion,” where the factory pop-up or Zenki/Kouki front clip of a 240SX is replaced with genuine or aftermarket S15 headlights, conversion fenders, hood, and front aero bumper.
Beyond cosmetic restyling, comprehensive conversions often integrate the S15’s superior engineering components—such as the helical limited-slip differential (HLSD), upgraded front suspension knuckles, 6-speed manual transmission, and the legendary ball-bearing turbo SR20DET powertrain.
Why Convert a 240SX S15?
Transforming your 240SX into an S15 tribute offers several major advantages over keeping the stock look:
- Unmatched JDM Exclusivity: The Silvia S15 was forbidden fruit in North America. An S15 front-end conversion gives your vehicle that ultra-desirable, head-turning presence that commands respect at every track day and car show.
- Modern Aerodynamic Flow: The sculpted front fascia and narrow projector headlights of the S15 dramatically modernize the dated square lines of an S13 or early S14, improving frontal downforce and high-speed stability.
- Precision Drift & Grip Geometry: Many enthusiasts pair the exterior swap with genuine S15 suspension geometry upgrades, yielding sharper steering angle and improved front-end bite.
- Vast Aftermarket Support: Specialty retailers like Overboost stock a wide variety of bolt-on conversion brackets, FRP and carbon fiber conversion fenders, and vehicle-specific performance upgrades tailored directly to the 240sx s15 platform.
Common Types of 240SX S15 Conversions
There are multiple avenues for executing a 240sx s15 conversion, depending on your build philosophy and budget:
- Front-End Conversion (S13.5 or S14.5): The most popular and accessible build path. Utilizing hybrid conversion fenders that mate to the S13 or S14 door jambs while wrapping around S15 headlights and bumpers, this swap gives the 240SX an unmistakable S15 face.
- Full Exterior & Aero Conversion: Extending beyond the front clip, this package integrates custom S15-styled rear bumpers, aero side skirts, roof spoilers, and GT rear wings for complete visual cohesion.
- Performance & Drivetrain Conversion: Tailored for competitive drifting or circuit time-attack. This build integrates the S15 Spec-R rear subframe, 6-speed transmission, helical LSD, and large front-mount intercooler setups with an S15 Spec-R SR20DET engine swap.
Essential Parts for a 240SX S15 Conversion
Sourcing premium-quality components is paramount for achieving factory-tight panel gaps and electrical reliability. Essential parts include:
- S15 Headlights: The defining element of the conversion. Available as genuine OEM Nissan HID/halogen units or high-output aftermarket projector housings.
- Conversion Front Fenders: Purpose-built hybrid fenders designed specifically for S13-to-S15 or S14-to-S15 conversions. They feature 240SX door and A-pillar lines at the rear while conforming to S15 headlights and bumpers up front.
- S15 Hood: Aluminum OEM or vented carbon fiber / fiberglass hood shaped to match the razor-sharp S15 headlight inner contours.
- S15 Front Bumper & Grille: Spec-R aero bumper or aftermarket body kit front fascia featuring enlarged cooling ducts for intercoolers.
- Core Support Conversion Brackets: Custom metal or billet brackets engineered to properly elevate and position the S15 headlight assemblies on the 240SX radiator core support.
- Headlight Wiring Harness Adapters: Plug-and-play jumper harnesses to adapt factory 240SX headlight and turn signal plugs to S15 sockets.
- Aero Side Skirts & Rear Valances: To balance the lower, more aggressive front fascia with the rear half of the vehicle.
Step-by-Step Guide for Converting a 240SX S15
Achieving a show-stopping result requires meticulous patience and methodical installation. Follow this five-step roadmap to bring your build to life.
Step 1: Choosing the Right Parts for Your 240SX S15
Before unbolting your front clip, establish a detailed parts checklist. Choose between OEM metal panels or lightweight fiberglass/carbon fiber options. OEM metal components offer unparalleled fitment but command premium prices, whereas high-grade FRP conversion panels from reputable suppliers like Overboost provide substantial weight savings and aggressive styling at an accessible price point.
Step 2: Disassembling the Original Parts
Park the vehicle on level ground and disconnect the battery. Carefully remove the existing front bumper, grille, hood, pop-up headlight assemblies (on S13) or factory headlights (on S14), and front fenders.
Bag and label all factory hardware, retaining clips, and fender shims. Unplug headlight wiring harnesses cleanly without cutting factory chassis pigtails. Thoroughly clean and inspect the radiator support and frame horns for corrosion or prior collision misalignments.
Step 3: Installing the New Parts
Golden Rule: Always dry-fit all conversion panels before applying paint. Install your conversion headlight brackets onto the core support loosely. Set the S15 conversion fenders into place and hand-tighten the upper rail bolts along the engine bay.
Slide the S15 headlight assemblies into their brackets, mount the hood onto the hinges, and test-fit the front bumper cover. Check how the lower edge of the hood meets the upper eyebrow line of the headlights and verify that the fender gap along both front doors remains uniform.
Step 4: Fine-Tuning and Alignment
With all panels temporarily positioned, fine-tune alignment by adding fender shims, slotting mounting holes slightly if needed, and adjusting the rubber hood bump stops. Aim for an even 3mm to 4mm panel gap across all mating seams.
Next, wire the lighting system using quality conversion harnesses. Verify low-beam, high-beam, turn signals, and hazard lights before torquing down headlight mounting bolts. If suspension or steering components were adjusted during the build, take the vehicle for a four-wheel laser alignment.
Step 5: Final Adjustments and Testing
Once fitment is perfected and panels return from professional paint matching, secure all fasteners, reinstall inner wheel arch splash liners, and torque all hardware to spec. Take the car on a low-speed shakedown cruise. Listen for any wind buffeting, check for tire clearance at full steering lock, and inspect mounting clips after your drive.
Conclusion
A properly executed 240sx s15 conversion is the ultimate tribute to golden-era Japanese performance styling. Blending the beloved driving dynamics of the classic 240SX with the sharp, timeless lines of the Silvia S15 produces a unique automotive masterpiece that stands out anywhere in the world.
Ready to start your S15 transformation? Browse our extensive catalog of conversion fenders, performance bumpers, and chassis upgrades at Overboost to equip your build with the industry’s best components.
FAQs
What parts are required for a 240SX S15 conversion?
A standard S15 front-end conversion requires S15 projector headlights, conversion front fenders (S13-to-S15 or S14-to-S15 hybrid fenders), an S15 hood, an S15 front bumper cover, headlight conversion mounting brackets, and wiring harness adapters. Full conversions may also incorporate S15 side skirts, rear valances, spoilers, and mechanical drivetrain upgrades.
How much does a 240SX S15 conversion cost?
A DIY front-end conversion using aftermarket FRP panels and headlights generally costs between $2,500 and $5,000 for parts and materials. Using genuine OEM Nissan metal panels, OEM HID headlights, professional prep, paint blending, and labor will typically range from $6,000 to $10,000+. Comprehensive builds including an SR20DET engine swap can exceed $15,000.
Can I convert my 240SX S15 to a drift car?
Yes! The S13.5 and S14.5 conversions are legendary in professional drift competitions worldwide, including Formula Drift and D1GP. When paired with adjustable coilovers, angle kits, and a 2-way limited-slip differential, the converted car delivers world-class drift capability with unmatched visual aggression.
How long does a 240SX S15 conversion take?
For an experienced DIY enthusiast, dry-fitting and installing a bolt-on conversion kit typically takes 12 to 24 hours of labor across one or two weekends. Bodywork, prep, primer, painting, and clear coat curing at a professional bodyshop typically adds 1 to 3 weeks of turnaround time.
Is professional help needed for a 240SX S15 conversion?
While the mechanical unbolting and dry-fitting can certainly be tackled by an enthusiastic home builder, professional assistance is strongly recommended for custom bracket fabrication, paint matching, and panel gap alignment. Professional craftsmanship ensures seamless transitions between body lines and optimal weatherproofing.
Leave a Reply