
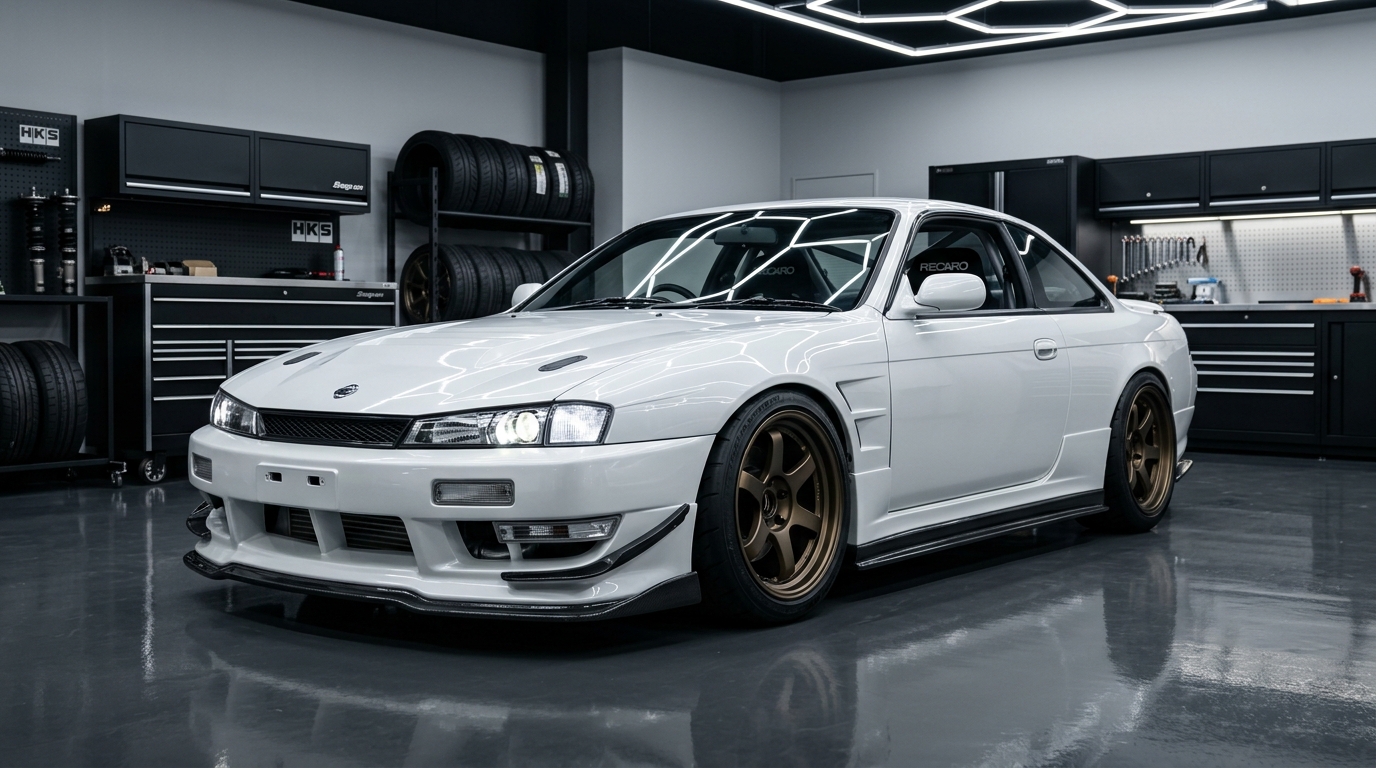
The Nissan 240SX S14 has stood the test of time as an enduring symbol of 1990s Japanese sports car style, precision handling, and motorsport heritage. For car enthusiasts around the world, taking on a 240sx s14 conversion is far more than an ordinary weekend wrenching project—it is a transformative journey that fuses timeless JDM aesthetic elegance with high-output engineering brilliance.
Produced between 1995 and 1998 in North America, the S14 chassis delivered a wider track width, stiffer unibody rigidity, and a longer wheelbase than its predecessor. Whether you are building an aggressive street machine, executing an authentic Kouki aero transformation, or building a competitive track weapon, this comprehensive guide illuminates every phase of planning, parts selection, installation, and tuning for your 240sx s14 build.
What is a 240SX S14 Conversion?
A 240sx s14 conversion refers to the comprehensive upgrading, restyling, or mechanical retrofitting of a Nissan 240SX S14 chassis. In North America, the S14 was released in two distinct iterations:
- Zenki (“Early Period”, 1995–1996): Characterized by smoother, rounded front-end styling, softer glass headlights, and a subtle factory bumper.
- Kouki (“Later Period”, 1997–1998): Featuring sharp, aggressively contoured projector headlights, an angular hood, wider front fenders, and a sculpted aero front bumper.
Because the North American market only received the naturally aspirated 2.4-liter KA24DE engine, an S14 conversion often combines front-end body restyling (such as the coveted Zenki-to-Kouki swap) with authentic Japanese Silvia styling elements, high-horsepower engine transplants, and race-grade chassis reinforcements.
Why Convert a 240SX S14?
The factory S14 offers a remarkably balanced foundation, but performing a conversion elevates the chassis from a vintage cruiser into a legitimate high-performance powerhouse. Key reasons enthusiasts choose to convert their S14 include:
- Aggressive Visual Stance: Swapping the softer Zenki front fascia for the razor-sharp Kouki aero layout instantly modernizes the car’s profile, making it one of the most striking silhouettes on the road.
- Unlocking High Horsepower: While the factory KA24DE is a reliable engine, it yields modest output. Transitioning to dedicated turbocharged powertrains unlocks 350 to 700+ horsepower.
- Chassis Rigidity & Handling: The S14 chassis boasts significantly higher torsional stiffness and a wider track than the older S13, making it an exceptional base for precision grip driving and drifting.
- Abundant Aftermarket Support: Platforms like Overboost supply a massive selection of performance upgrades, suspension geometry kits, and aero body components engineered specifically for the 240SX platform.
Common Types of 240SX S14 Conversions
Depending on your budget, driving discipline, and stylistic vision, a 240sx s14 conversion generally takes one of the following proven paths:
- Front-End Conversion (Zenki to Kouki): The most popular visual upgrade in the S-chassis community. Replacing the rounded Zenki front clip with sharp Kouki headlights, fenders, hood, grille, and bumper transforms the entire aesthetic demeanor of the car.
- Engine Swaps: Replacing the stock engine with high-performance powerplants such as the JDM SR20DET (“black top”), RB25DET NEO, Toyota 1JZ/2JZ-GTE, or an American GM LS-series V8 for instant torque.
- Drift Spec Conversion: Equipping the car with a 2-way limited-slip differential (LSD), extended lower control arms, high-angle steering knuckles, hydraulic e-brake, and roll cage for competition drift events.
- Full JDM Silvia S14 Transformation: Replicating the authentic Japanese Silvia K’s or Navan specification down to factory JDM aero valances, rear spoiler, power-folding mirrors, and authentic interior trim.
- Performance Track & Grip Build: Dialing in big brake kits (such as Brembo or Z32 calipers), functional rear diffusers, track-tested front splitters, and corner-balanced coilover setups for road-course supremacy.
Essential Parts for a 240SX S14 Conversion
A successful build requires gathering the right combination of high-grade components before taking the car apart. Essential parts include:
- Body & Aero Components: Kouki or Silvia front bumper, angular projector headlights, corner lights, front fenders, hood, side skirts, rear bumper valances, and mounting brackets.
- Powertrain & Drivetrain: Performance engine assembly, reinforced clutch and flywheel kit, custom conversion motor mounts, and an upgraded driveshaft.
- Engine Management & Wiring: Dedicated conversion wiring harness, standalone or chipped ECU, wideband O2 sensor, and electronic boost controller.
- Cooling & Induction: High-efficiency dual-core aluminum radiator, front-mount intercooler (FMIC) with mandrel-bent piping, silicone coupler kit, and thermo-controlled electric fans.
- Suspension & Chassis Geometry: Fully adjustable coilovers, front and rear sway bars, adjustable tension rods, rear upper control arms (RUCA), and toe rods.
- Fuel System: High-flow 255 LPH or 340 LPH in-tank fuel pump, upgraded fuel pressure regulator, high-impedance fuel injectors, and braided PTFE lines.
Steps for a Successful 240SX S14 Conversion
Executing a flawless conversion requires patience, methodical craftsmanship, and attention to detail. Follow this structured roadmap to complete your project smoothly.
Step 1: Selecting the Right Parts for Your 240SX S14
Begin by clearly defining the ultimate role of your car. Are you creating a clean weekend cruiser, a high-speed time attack contender, or an aggressive grassroots drift machine? Research component compatibility and establish a realistic budget that accommodates fluids, new hardware, gaskets, and professional tuning. Sourcing parts from trusted suppliers like Overboost guarantees you receive verified, premium-grade automotive parts engineered for exact fitment.
Step 2: Disassembling the Existing Components
Position the vehicle securely on sturdy jack stands on a level concrete surface. Disconnect the negative battery terminal and drain all vehicle fluids if pulling mechanical systems. Methodically unbolt the existing front bumper, headlights, fender liners, and sheet metal panels.
Store hardware in labeled containers and take clear reference photographs of wire routing, vacuum lines, and bracket orientations. Take this opportunity to inspect the core support and frame rails for any hidden rust or prior accident damage that could affect panel alignment.
Step 3: Installing the New Parts
With the chassis prepared and prepped, proceed with installation across three critical stages:
- Engine & Powertrain Installation: Bolt in the conversion motor mounts, carefully lower the engine into position, and verify clearances at the firewall, brake booster, and steering shaft. Hook up the custom conversion wiring harness, fuel delivery lines, radiator, and intercooler plumbing.
- Body Kit & Aero Installation: Always perform a complete test fit before sending parts to the paint booth. Align the Kouki headlights, front fenders, and hood hinges loosely. Check panel gaps along the A-pillars and doors before securing all clips, brackets, and fender bolts.
- Suspension Upgrade: Install adjustable coilovers, bolt on heavy-duty sway bars, and adjust suspension control arms to set your baseline ride height and geometry.
Step 4: Alignment and Calibration
Proper wheel alignment is crucial for the safety, tire longevity, and handling dynamics of your modified S14. Take the car to an experienced alignment shop to dial in proper camber, caster, and toe settings tailored to your wheel fitment and intended driving discipline.
Following mechanical setup, professional dyno calibration is mandatory. An experienced tuner will calibrate your ECU map to establish safe air-fuel ratios, optimize spark timing, and ensure consistent boost delivery while protecting your engine investment.
Step 5: Testing and Final Adjustments
Before hitting the road, conduct a thorough nut-and-bolt check of all suspension fasteners, verify fluid levels, bleed cooling and brake hydraulics, and confirm that all lights and auxiliary gauges operate properly. Begin test driving at low speeds, listening carefully for unusual vibrations, rubbing, or temperature spikes. Fine-tune damper dampening settings, clutch pedal engagement, and tire pressures as you get acclimated to your new machine.
Conclusion
Completing a 240sx s14 conversion is a testament to automotive craftsmanship and dedication. Blending Japanese tuning heritage with modern performance upgrades results in an exhilarating machine that turns heads everywhere it goes while delivering pure analog driving thrill.
Ready to start your next build? Discover premium performance parts, suspension systems, and body upgrades at Overboost to transform your Nissan S14 into an automotive icon.
FAQs
What parts are required for a 240SX S14 conversion?
Essential parts include upgraded front-end body panels (such as Kouki headlights, front bumper, hood, and fenders), a performance engine long block and swap mounts, a conversion wiring harness, an aluminum radiator, an upgraded fuel pump, and adjustable suspension components. The exact parts list depends on whether your conversion is aesthetic, mechanical, or both.
How much does a 240SX S14 conversion cost?
Total project costs generally range from $5,000 for a modest aesthetic Kouki front-end conversion to $25,000+ for a full-scale build that includes a high-output engine swap (such as an SR20DET, RB25, or LS V8), custom paint, standalone engine management, and professional dyno tuning.
Can I convert my 240SX S14 into a drift car?
Absolutely! The Nissan S14 is one of the most successful drift chassis in motorsport history. With its stiff unibody, balanced weight distribution, and immense aftermarket steering angle kits, a limited-slip differential and quality coilover setup make it a formidable drift competitor.
How long does a 240SX S14 conversion take?
A bolt-on Zenki-to-Kouki front-end conversion typically takes 10 to 20 working hours across a weekend, assuming parts are pre-painted. Complete mechanical conversions involving engine swaps, wiring, and chassis overhaul usually take anywhere from 1 to 3 months of dedicated weekend garage work.
Is professional help required for a 240SX S14 conversion?
Many intermediate home mechanics successfully install bolt-on body panels, coilovers, and basic mechanical parts. However, professional assistance is strongly recommended for custom wiring harness integration, ECU calibration, paint matching, and four-wheel laser alignment to guarantee optimal safety and engine longevity.
Leave a Reply