
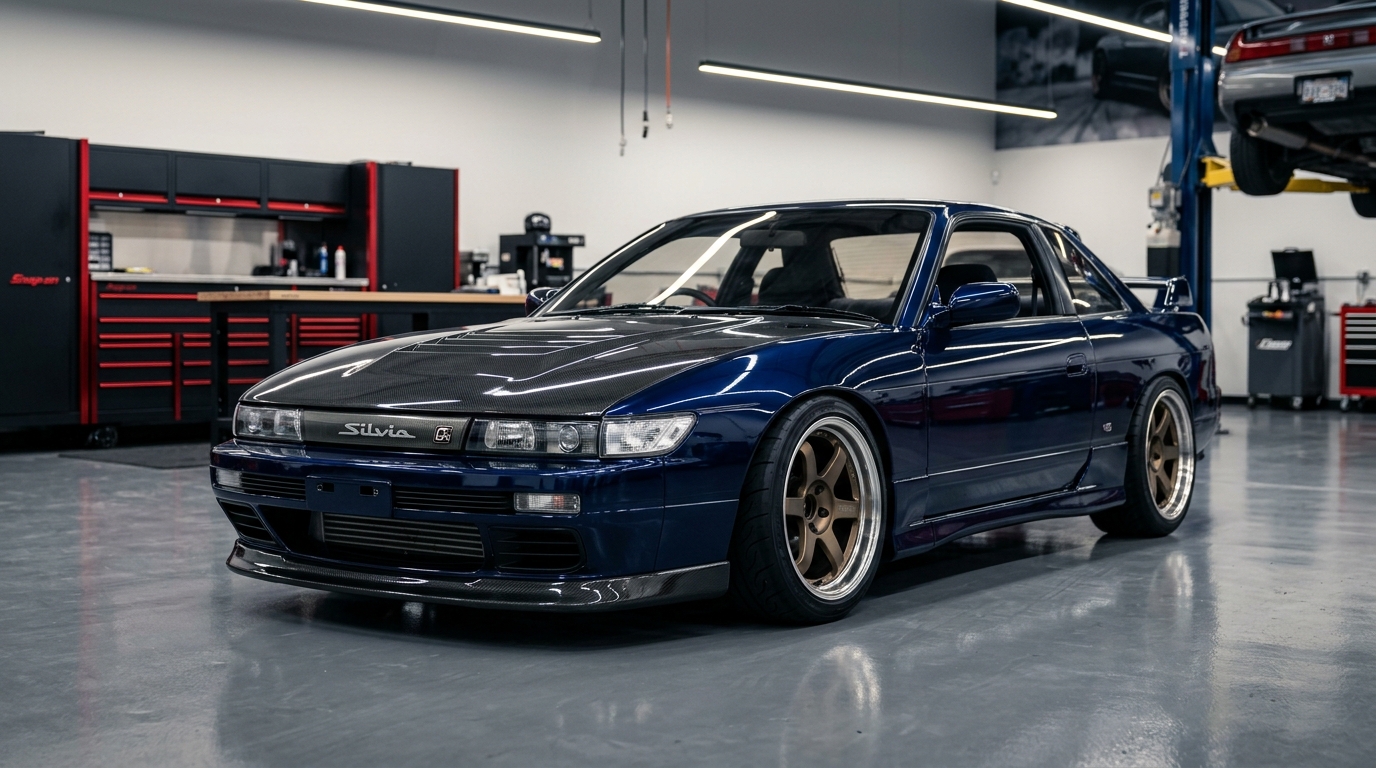
For any true car enthusiast, very few builds capture the imagination, raw excitement, and limitless creativity quite like a 240sx s13 conversion. Originally manufactured by Nissan between 1989 and 1994, the Nissan 240SX S13 has cemented itself as an immortal icon across grassroots drifting, track racing, and automotive tuner culture. Renowned for its lightweight rear-wheel-drive chassis, near-ideal 50:50 weight distribution, and immense aftermarket potential, the S13 serves as the ultimate canvas for automotive reinvention.
Whether you are planning a high-horsepower powertrain transplant, hunting down rare Japanese styling components, or restoring a barn find to showroom glory, understanding the fundamentals of a 240sx s13 project is essential. In this complete guide, we break down everything you need to know about planning, sourcing, and executing your build from start to finish.
What is a 240SX S13 Conversion?
A 240sx s13 conversion refers to the process of modifying, retrofitting, or replacing major factory components on a North American-spec Nissan 240SX (chassis code S13). While the US-market 240SX debuted with pop-up headlights (on fastback and coupe models) and a naturally aspirated single-overhead-cam (KA24E) or dual-overhead-cam (KA24DE) truck-derived 2.4-liter engine, its Japanese Domestic Market (JDM) siblings—the Nissan Silvia S13 and 180SX—received turbocharged powerplants and distinct front-end styling.
In modern enthusiast vernacular, an S13 conversion can encompass several distinct modification pathways:
- Aesthetic & Front-End Conversions: Swapping factory US pop-up headlights and bumper assemblies for fixed JDM Silvia headlights, fenders, hoods, and bumpers (commonly called the “Silvia front” or “Sil80” / “Onevia” conversions).
- Powertrain Conversions: Performing high-output engine swaps for 240sx chassis to unlock 300 to 600+ horsepower.
- Chassis & Drivetrain Conversions: Converting 4-lug wheel hubs to heavy-duty 5-lug hubs, installing limited-slip differentials (LSD), and reinforcing chassis seams for track stress.
- Drift or Track Conversions: Stripping weight, installing roll cages, angle kits, hydraulic handbrakes, and coilovers for competitive motorsport.
Why Convert a 240SX S13?
While a stock 240SX offers nostalgic 90s charm, executing a conversion unlocks the chassis’s hidden motorsport DNA. Enthusiasts invest in conversions for several compelling reasons:
- Massive Performance Gains: The original factory KA24 engines are bulletproof workhorses, but their modest factory output (140–155 hp) leaves spirited drivers craving more. Upgrading via proven engine swaps for 240sx platforms unleashes modern supercar acceleration and aggressive throttle response.
- Iconic JDM Aesthetics: Transforming a standard US pop-up front end into a sleek, fixed-headlight Silvia S13 front fascia gives the car an unmistakable JDM road presence that commands attention at every car meet.
- Unmatched Customization Freedom: The S13 is a modular Lego set of automotive engineering. You can tailor every detail—from suspension geometry and steering angle to interior instrumentation and aero styling—to match your exact driving style.
- Colossal Aftermarket Support: Over three decades of tuning heritage mean that dedicated platforms like Overboost offer thousands of vehicle-specific performance parts, bolt-on swap brackets, and custom aero kits engineered specifically for the 240sx s13.
Common Types of 240SX S13 Conversions
Depending on your budget, mechanical skillset, and automotive vision, a 240sx s13 conversion typically takes one of the following forms:
- Silvia Front-End Conversion: Replacing front fenders, hood, headlights (either dual-projector, triple-projector, or iconic “bricks”), corner lights, and bumper to replicate the Japanese Silvia S13.
- Hybrid Front Conversions (Sil80 & Onevia):
- Sil80 (Sileighty): Installing a Silvia front end onto a 240SX Fastback/Hatchback.
- Onevia: Retaining pop-up headlights on an S13 Coupe chassis.
- S13.4 & S13.5 Conversions: Grafting later-generation S14 or S15 front clips onto the S13 body for a sharper modern look.
- High-Performance Engine Swaps: Replacing the stock engine with iconic performance powerplants (detailed below).
- Suspension and Angle Geometry Conversions: Installing fully adjustable coilovers, lengthened lower control arms, steering angle adapters, and high-performance sway bars for drifting precision.
- 5-Lug and Big Brake Conversions: Upgrading from factory 4×114.3 hubs to 5×114.3 hubs using Z32 300ZX or S14 spindles to fit modern performance wheels and 4-piston calipers.
- Widebody and Aero Packages: Installing overfenders and full aerodynamic body kits to widen the track width by 30mm to 75mm per side.
Key Parts Required for a 240SX S13 Conversion
Executing a clean conversion requires careful parts staging before turning the first wrench. The core components include:
- Powertrain Package: Engine long block, transmission, clutch assembly, and swap-specific motor/transmission mounts. Popular engine swaps for 240sx include:
- SR20DET (2.0L Turbo Inline-4): The authentic factory JDM choice. Lightweight, balanced, and capable of 350+ hp on stock internals.
- RB25DET / RB26DETT (2.5L / 2.6L Turbo Inline-6): Renowned Skyline soundtrack with monster power potential.
- 1JZ-GTE / 2JZ-GTE (3.0L Turbo Toyota Inline-6): Indestructible bottom end for high-boost drag and pro-drift builds.
- GM LS-Series V8 (5.3L / 5.7L / 6.0L / 6.2L): Massive instant low-end torque, unshakeable American reliability, and inexpensive replacement parts.
- Wiring Harness & ECU: A custom conversion harness (e.g., Wiring Specialties) ensures plug-and-play reliability with standalone or factory ECUs without phantom electrical gremlins.
- Cooling System: High-capacity dual-pass aluminum radiator, electric slim fans, front-mount intercooler (FMIC) kit, and external oil cooler.
- Fuel Delivery: High-flow in-tank fuel pump (Walbro 255 or AEM 340), upgraded fuel rails, high-cc injectors, and PTFE fuel lines.
- Driveshaft & Differential: Custom-length driveshaft (steel or aluminum) paired with an upgraded R200 limited-slip differential.
- Body Panels & Brackets: OEM or high-grade FRP conversion fenders, headlight brackets, hood hinges, and bumper supports.
Steps for Performing a 240SX S13 Conversion
Transforming your 240sx s13 demands methodical execution. Follow these five essential steps to bring your project across the finish line safely and cleanly.
Step 1: Choosing the Right Parts for Your 240SX S13
Define your primary vehicle objective first: daily-driven street cruiser, show winner, or dedicated drift missile? Establishing your goal prevents costly “re-dos” down the road. Map out an itemized budget that includes not just the major swap components, but also often-overlooked essentials: fluid flushes, gaskets, new hardware, custom hoses, and dyno tuning time. Sourcing verified components from trusted aftermarket suppliers like Overboost guarantees proper fitment and quality.
Step 2: Disassembling the Original Components
Park the vehicle on solid, level ground and secure it on heavy-duty jack stands. Disconnect the battery and drain all vehicle fluids (engine oil, coolant, transmission oil, and power steering fluid). Carefully remove the front bumper cover, headlights, wiring clips, and radiator core support if needed.
When pulling an engine or suspension assembly, bag and label every single bolt, nut, and connector. Taking reference photos of wire routing and vacuum lines before disassembly will save countless hours during the reassembly phase.
Step 3: Installing the New Parts
With the engine bay stripped and degreased, install your conversion mounts and test-drop the new powertrain into position. Check firewall clearance, transmission tunnel clearance, and steering rack shaft angles before torquing down mount bolts. For front-end conversions, test-fit your conversion fenders, hood, and Silvia headlights loosely to establish baseline gap alignment prior to final fastening.
Route the conversion wiring harness away from hot exhaust manifolds and moving steering shafts. Install the aluminum radiator, intercooler piping, fuel lines, and custom driveshaft according to torque specifications.
Step 4: Alignment and Tuning
Once mechanical assembly is complete, suspension geometry must be dialed in. If you have installed coilovers, adjustable camber arms, or modified steering knuckles, take the car to an alignment specialist experienced with modified drift and track setups to set proper camber, caster, and toe angles.
Next comes engine management. Never run a freshly swapped turbocharged or high-compression engine hard on an unverified base map. Book dyno time with a reputable tuner to establish safe air-fuel ratios, optimize ignition timing, and confirm steady oil pressure and cooling temperatures across the entire rev range.
Step 5: Final Adjustments and Testing
Perform a comprehensive pre-flight inspection before heading out for a shakedown drive: inspect for fluid leaks, verify electric fan activation temperatures, bleed the clutch and brake hydraulics thoroughly, and check wheel lug torque. Begin testing with low-speed neighborhood cruising, monitoring temperature and oil pressure gauges closely. Gradually increase throttle load as your confidence in the build grows.
Conclusion
A completed 240sx s13 conversion is one of the most fulfilling accomplishments an automotive enthusiast can achieve. By combining classic Japanese chassis balance with modern power and timeless JDM styling, you create a machine with soul, character, and thrilling performance that few modern vehicles can match.
Ready to turn wrenches on your S13? Explore our full catalog of performance upgrades, suspension systems, and aero packages at Overboost to get the exact parts you need for a legendary build.
FAQs
What parts are needed for a 240SX S13 conversion?
Typical parts include an upgraded engine and transmission (such as an SR20DET, RB25, or LS V8), custom conversion wiring harness, swap engine mounts, high-capacity aluminum radiator, upgraded fuel delivery system (pump and lines), and a custom driveshaft. For aesthetic conversions, you will also need Silvia front fenders, hood, headlights, corner markers, and a matching front bumper.
How much does a 240SX S13 conversion cost?
Total conversion costs typically range from $5,000 to over $25,000 depending on the scope of the project. A basic Silvia front-end conversion costs between $2,000 and $4,500 in parts and paint. Comprehensive engine swaps for 240sx builds generally start at $7,000 for a DIY SR20DET swap and can exceed $15,000 to $20,000+ for turnkey professional LS or 2JZ builds including labor, standalone electronics, and dyno tuning.
Is it possible to perform a 240SX S13 conversion on my own?
Yes! Thousands of enthusiasts have completed S13 conversions in home garages. With a reliable engine hoist, basic metric hand tools, jack stands, and patience, mechanical swaps and bolt-on front-end conversions are very achievable for intermediate DIYers. However, seeking professional assistance for ECU calibration, wiring harness construction, and precision suspension alignment is highly recommended.
How long does a 240SX S13 conversion take?
A straightforward Silvia front-end conversion can be completed over a single weekend (10–16 hours) if parts are prepainted. An engine swap typically takes between 40 and 100 working hours spread across several weeks or months for DIYers, depending on parts availability, wiring complexity, and unforeseen troubleshooting.
Can I convert my 240SX S13 to a drift car?
Absolutely! The 240sx s13 is globally considered the premier grassroots drifting platform. Its lightweight chassis, long wheelbase relative to track width, and immense availability of drift knuckles, coilovers, angle kits, and limited-slip differentials make it exceptionally easy to set up for competitive drifting.
Leave a Reply